
My daughter had been given an infinity card for Christmas and I was fascinated by it. I had no idea how it was made - and then I stumbled across a great clip and a template by Toymaker Marilyn Scott Waters (via one of my reader's comments - I have been trying to search and find who of you had a link to Toymaker, and give you credit for the inspiration - sorry, can't find you again, please accept my thanks this way...)
To really show you how the infinity card works, I've made a little video. Check it out, it's only a minute long and shows the magic in action:
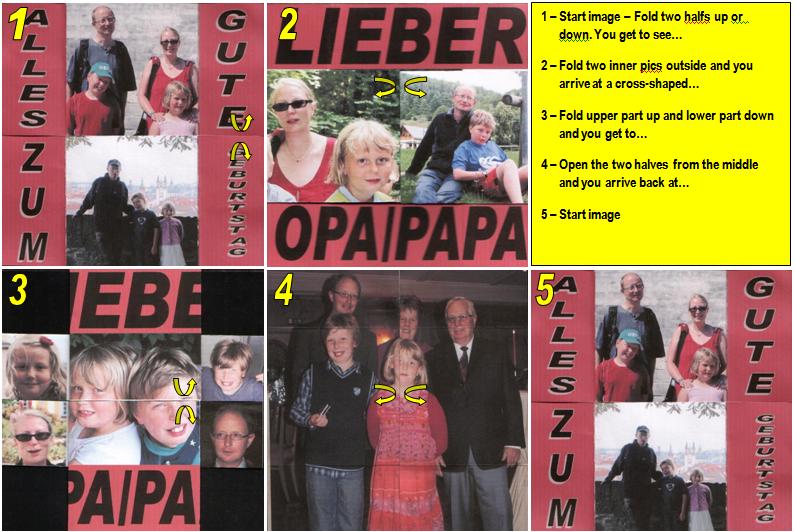
I nearly lost the plot making this card - the template I worked with had graphics, not photos, and so I had to experiment in order to get the orientation of the photos right. You see, the images get "twisted around" when you fold and turn the card. I think I printed about five drafts until I got it right. (And while writing this tutorial I also realised that I needed to take pictures to show what you need to do - words are not enough...). This is what happens:
Good person that I am (...), I have decided to make a template for those of you who want to recreate this, using your own photos. You can download it (for free, of course) at the end of the post via scribd. (Aside: Wow, I am really learning so much while I am blogging - scribd is so cool for document sharing!!!)
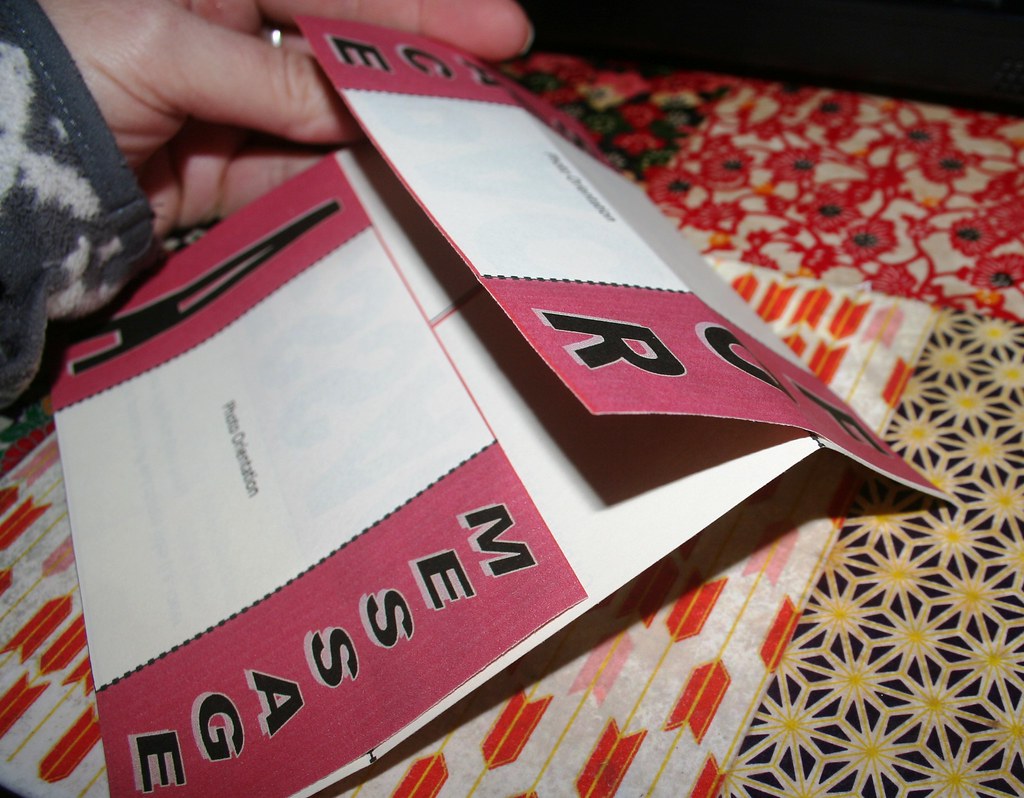
A few notes on making the card: The template is general and allows you to adapt it with your own message and photos. The red boxes are designated for a message. Word MS will let you click onto the writing in the boxes and add your own message. The orientation of my notes in the document shows you which way up the pictures should go. You can simply copy and paste photos and place them in/on the document, sizing them as required. Note that you may have to cut photos in half and change their sides so that they show up correctly in the finished card!!! (I have indicated that in the template.)


Take the two remaining strips with page 1 facing up. Page 2 also has four boxes labelled "Glue Point". Attach them to the bottom square by placing glue point onto glue point.
Here is the template for downloading. I am not sure why, but scribd's preview shows the elements of the card scrunched together and overlapping. I have tried downloading it and the template comes out correctly on four separate pages, just the way you can work with it. I created it using MS Word 2007.
Template for Photo Infinity Card
By the way - opening and folding the card backwards does not work!! It only works seamlessly if you start with your message square first; otherwise the pictures and the text will be completely jumbled up...
Hope this wasn't too complicated? Have fun with this - it will amaze your children and is an easily made card for any occasion: next birthday? Valentine's Day? Paddy's Day? Or just for a loved one to show that you care and are willing to spend time on an original craft for them.
Best,

PS: Have you entered the giveaway? It's your last chance now - I am pulling it off tonight at 11.30 pm GMT. Just go to my celebration post and leave me a comment. Seriously, that's all!
PPS: Yay:

Linking to:


12 comments:
Sonja, that is AMAZING. I must try it. Thank you for spending the time putting it all together.....it must have taken forever (lol). I truly cannot imagine, but I love it!
That is beautiful - and so special for the person receiving it. My SIL makes cards and they are so beautiful. You all inspire me.
Just so lovely. I will definately follow along.
AMAZING IDEA!!!!
~ Emily N. from "too Blessed to Stress"
What a special card! Your details are so easy to follow along. Thank you.
I hope you'll drop by AtticMag to tour my home.
Allison
Great card!
God's blessings,
Sarah :D
I am in love with this idea!! I'm homeschooling 4 kids and always looking for a unique way for them to make things that show what they are learning. I think I will use your template to create mini cards on the artists we are studying.
This is so cool! Thank you so much for making the template and instructions. I think I'll make one for my niece for her birthday.
Hey everyone, thanks for all your comments! So pleased that my instructions and template might be of use for others. Good luck with it - they are such fun and really easy to make!!!
Thanks for your template. I shall try this. My son was given something like this when the fire service visited his school - it showed you what to do if there was a fire - and we played with it for ages trying to work out how it worked. I never did discover quite how to do it. But I did discover flexagons and even made a Tritetraflexagon - which is probably easier to make than to spell!
Check out the wikipedia entry if you are interested in more of these amazing folding thingamebobs.
How fun is that?
Thanks for sharing!
-Tiff
I can't get the link to work for the template. Could you please update it? Very neat idea! Thanks for posting about this :)
Post a Comment