FYI


Thursday, January 24, 2013

My Bloody Valentine

Craftworld is probably going to dismiss me dishonourably for writing this - but I really do NOT care for Valentine's Day at all. The craft-blogging universe is full of hearts this and pink that. A difficult time of year for me. So I would like to point out that the following project is NOT a Valentine's project. But hey - if you want a heart display for your Valentine's decor, then be my guest. It fits the description...


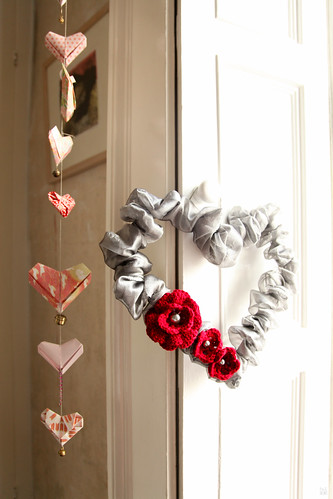
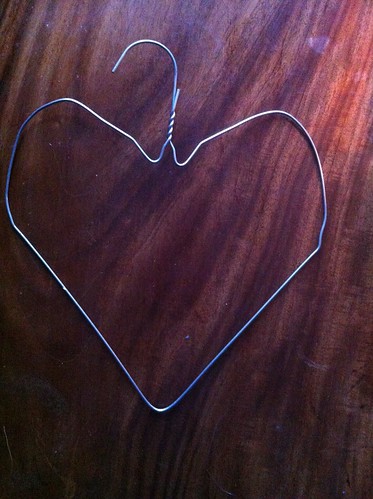
This is something I had been meaning to make for a long time. You see, I tidied up my wardrobe last autumn and threw out lots of wire hangers. Except I held on to them, to make wreaths with them. (I made a nice bauble wreath before Christmas, alas, I was not active on Craft-Werk at the time, so that'll only see the light of blogworld next December...) And then my friend-in-blogdom Jutta of Organized-living-solutions posted this darling little heart wreath of hers a couple of weeks ago. Combined with the recent crocheting craze that I have been going through, I had the perfect project cut out for me.

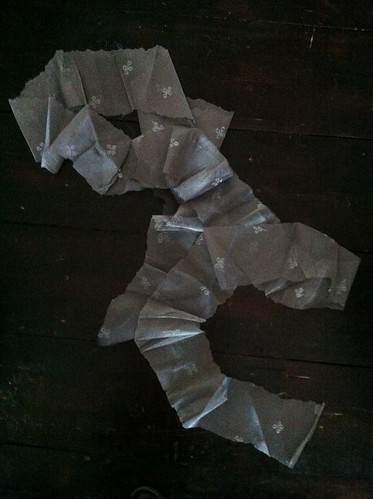
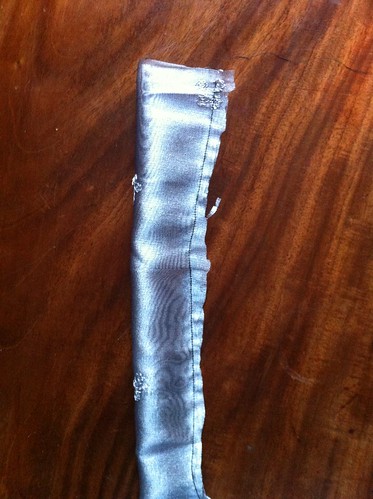
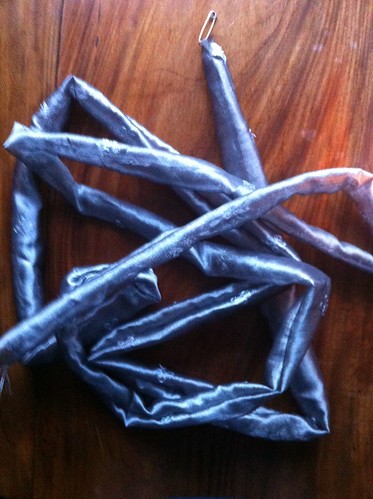
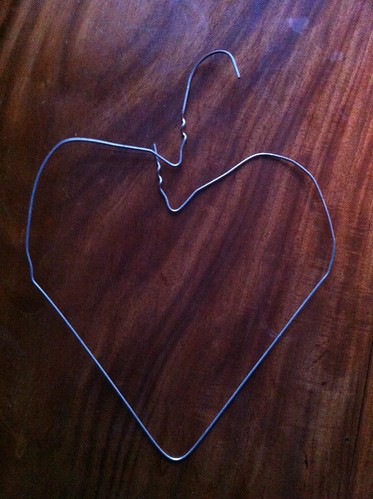
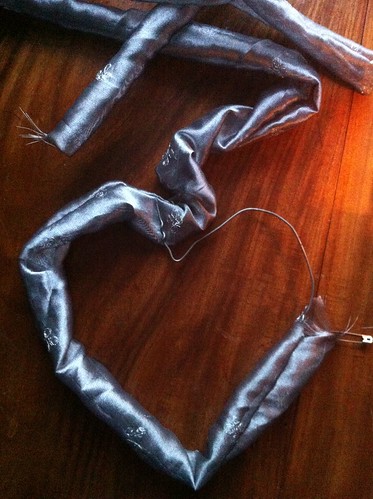
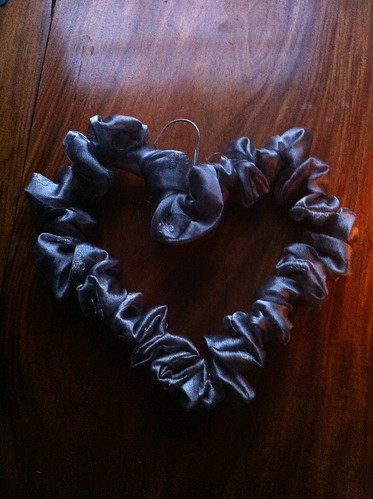
And this is how made my ruffled heart wreath:

You need a wire hanger and some fabric. I happened to find a looooong off-cut from some silvery curtain material in my stash. I think I cut that off when I covered a lampshade with that, yonks ago... Anyway, you want a two-meter long and about 10 cm wide piece of fabric for this.


Fold in half lengthwise and just sew together, creating a long tube.

Now comes the fun part: Turn the tube inside out.

Next bend your wire hanger into shape. This is best done while the wire has not been untangled at the top. Simply pull down the straight bit in the middle, smooth out the bumps at the side and then push down the hanger top to create the dip of the heart. You might find it easier to do that lying the hanger flat on a table top.

Undo the two wires from each other to open up the heart.

Thread the fabric tube onto the wire.

Presto, here is your undecorated but already ruffly heart-shaped wreath:

I decided to add a bit of colour. My crochet flowers had to be incorporated somewhere. After sewing brooch needles on the back of the flowers, I then simply attached them to the fabric.

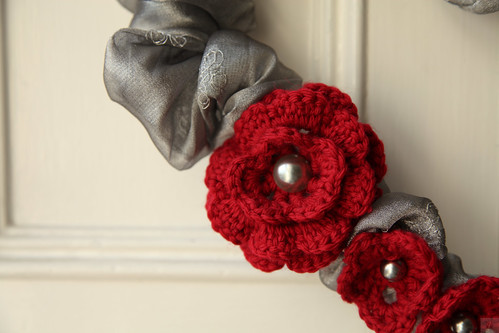
Word of advice: the lighter your decor in weight, the easier to arrange on the heart. My crochet flowers kept pointing downwards with the gravity. I eventually fixed that by keeping them in place with some cheap pearl earrings - they actually make the flowers look even better than without them.


The great thing is, the wreath itself is pretty neutral - so I can redecorate this any time of year - with some sparkly stuff for Christmas, some punchy flowers in spring time and some fluttering butterflies in summer. Maybe paper deco works best here as heavy items will drag the ruffle fabric down... the crochet flowers are about as much as it will take.


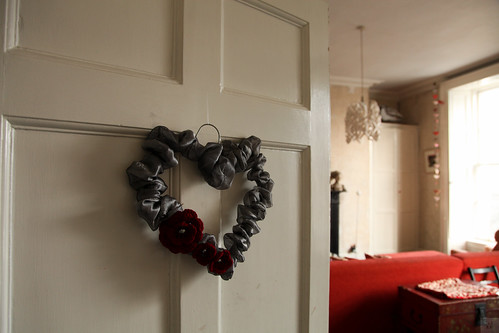
I am hanging the wreath on the drawing room door - as I haven't got a useable front door, this is the first door in my own living space that my visitors see. I welcome them with an open heart ;-)


Best,


PS: Linking to Blog Link Party @ Somewhat Simple Transformation Thursday @ Shabby Creek Cottage


Sunday, January 20, 2013

Knitted Collar/Scarf

Another project from my recent Knitting Renaissance came courtesy of a friend who passed on a knitting kit to me. It came from a great new initiative called Supercraft which aims to get people crafting and creating. Such fuuuuuuuuuuuuuuuuun!

Yeah, that's me, having a bit of fun while working on that project...
So, Supercraft. What it is, is essentially a craft-kit subscription. You sign up on their website and they send you a fancy box with all ingredients for some crafting every two months. It contains everything that you need for a number of different projects that they describe in their well-produced and easy-to-follow, accompanying booklet. To the right you see the contents of the kit that I worked with (which came courtesy of a non-knitting friend).

The paperbag contained a couple of buttons, some stitching thread, elastic thread and a stitching needle. Everything that was needed to complete the proposed project.

I opted for a collar/scarf which was extremely easy to knit and took one afternoon to make. What usually puts me off knitting is the annoying sewing-together you have to do at the end. Now that all the tools were at hand, I had no excuse to finish the scarf and therefore it got done.

I sewed a one-off, hand-made glass button as a decoration onto the collar, to give it a bit of bling.


And here it is:
Suffering from overexposure again... sorry.


Saturday, January 19, 2013

Knitting Hell

Recently I have been doing a lot of traditional hand-crafts. It all started when I decided I needed a crafts project I could take on my summer holiday. Yep, already an age ago, but there you go. Crocheting or knitting, I didn't really care, as long as it kept my fingers busy on the family holiday in Denmark. I set my mother on the case and she got me a lovely project in the local yarn shop.


Even for beginners, the project I settled on was one of the easiest you could start with. I knitted a triangular scarf. The special thing about it was that you had to knit it with needles with different thickness, in order to get a row of really big stitches and an alternating row of tight stitches. As the scarf will be growing in width as you go along, you best knit on a circular knitting needle.

When I bought my wool in the shop, the assistant actually did a great sales speech and sold me a nifty knitting needle where the ends are not fixed permanently but you can exchange them. So I had a thin needle at one end of the circular knitting needle, and a thick one at the other. The sizes used were 2.5 and 9.

And then it is only knit - purl - knit - purl all along.

You start off with three plain stitches on your thin needle. For the second row you also just knit the three stitches. After that, in every row, you add one loop at the beginning and one at the end. That way your scarf becomes a triangular shape.

Once I finished my scarf, I made three tassles from the remaining wool. I pulled the bits of wool through a loop at each of the three points, then threaded a wooden bead from my daughter's jewellery box on to the wool and secured it with a simple knot.


I really love my scarf and have been wearing it quite a bit this winter.

Thursday, January 17, 2013

Frame-Work

Ok, I better show you this before January passes and it is definitely too late to have this message anywhere:


It's the old trusty empty frame again... It has been keeping me company in my kitchen for four years now and it has seen many transformations. Essentially it has framed anything from a bunch of milk jugs via wreaths to an assortment of Christmas baubles.

I actually put the thin silver string into the frame for my last Christmas display. It was an idea I had when I came across a pack of 50 mini silver pegs and silver string in the Irish equivalent to the Dollar Store. It was € 1.50 and was actually meant for stringing up Christmas cards. Instead I fixed the string to the frame and then hung all those misc Christmas decorations on there that usually just sit in a corner of the empty Christmas deco boxes. Here's the Christmas frame (sorry, anachronistic, but just for comparison purposes...)


Oh Cod, the photo quality is atrocious. Don't tell anyone I am a photographer. I was being lazy and only snapped pictures with my iPhone. That has got to stop from now on, back to proper photographs.

Anyhow, there you have it - the frame doing its service. I am already thinking up a slightly Valentine-esque display for February. Watch this space!

Wednesday, January 16, 2013

Comfy Cat Cushion

The recent cushion-making spree was actually started by this:


No, my cat Skittles is not that good with her paws. But she took possession of the cushion you see underneath her there in her box - and thus forced me to come up with alternative cushion covers for the sitting room.

But this is the starting point: For aaaaages I had been hanging on to what used to be one of my favourite summer tops. It's an Empire line knitted top from H&M that I loved to bits - literally, because eventually it had small little holes right across the belly and became unwearable. But I always liked the material and left it sitting at the bottom of my wardrobe for an alternative use.

Then at the weekend I finally set to sewing a cushion cover from it. I simply cut the top of the shirt off and then cut straight up the bottom of the fabric.

I sewed it with an overlapping back for easy removal. The A-line dimension proved to be difficult to deal with - the resulting cushion was a bit wonky. I put the cushion aside - and Skittles immediately took up residence on the cushion and claimed it to herself.

Ah well, she deserves to be comfy, too. 


Happy end. She got a comfy cushion, and I moved on to sew my six small Oriental cushion covers


Monday, January 14, 2013

Oriental Bling

So this is how I spent my Sunday afternoon:


No, not lounging on the sofa in front of a cozy fire. I was a busy bee and sewed the cushions that are just visible there on the couch. This had been made necessary by the fact that my previous cushion project had become not only threadbare but cat-flea infested. Arrrrgh. So out with the old and in with the new.


On my post-Christmas shopping spree last year I snapped up six Ikea cushions at € 0.50 each. They are 35 x 35 cm in size, and since I had six of them, they called for a coordinated effort. Ahem.

A look in my much ignored fabric stash brought out a large piece of fabric that a friend had brought back from China for me. I cut the fabric to size, ironed it and then set to it with my sewing machine. Incidentally I found the reverse of the fabric nicer and more fitting with the rather orangy red of my sofa, so I made four of them and two of the actual fabric front. The cushion case is removable, so it can be thrown in the wash if the cats get too familiar with them, again.


With my recent Ikea bargain - the golden tray table - it looks as if I have a bit of an Oriental thing going on in my drawing room now:


I think this calls for a pillow fight, actually...

Best,


Linking to: Transformation Thursday @ Shabby Chic Cottage

Sunday, January 13, 2013

She Chokes

A great day, just the way I like Sundays. I spent all day crafting. Well, that's after I got out of bed at about 11 am... *theshame*. But then it was all systems go with MDF, a circular saw and paint, as well as a sewing machine and some fancy fabric. Project MDF is not ready yet and Project Sew needs to have photos imported. But since I am impatient to get stuff out here, I'll post Project Choke. Forgive me for the bad quality pictures - the next post will be nicer to look at (because it won't feature me in it!!!)

My beadbox, as I noticed today, is littered with lots of beaded half-domes. They are the residue of a craft project I went crazy on almost three years ago. (My, is it already that long ago? I would've thought it was only last year...) You can read about that here. And here. Eh, and here. Anyway, I don't like loose ends and I wondered what I could use them for. Since I didn't have any tulle to make more of these corsage flowers, I had to think of something else.


A choker, she choked. Indeed. Should I ever be invited to a Baroque-themed costume party, I am ready.

I had a bit of ribbon left hat I used for this little project. Also, I needed some velcro and the bead dome.


I basically stuck my velcro onto the ribbon after determining, how long the choker needed to be to fit snugly round my neck.


I quickly sewed over the velcro to keep it in place. Then I hand-sewed the bead dome onto the ribbon.


That's it. The photos aren't great, sorry, I was using my iPhone and I might try and take some better shots of it if I have time. Also, I didn't stage myself very well in this - wearing my usual fleece top instead of dressing up appropriately. But there you have it, I am too impatient to re-do the whole shoot now.


Linking to: Whatever Goes Wednesday @ Someday Crafts

Saturday, January 12, 2013

Happy New Year

Flowers in September? Well, that's what you saw until now on this blog. And all of that in the middle of January. I may have completely ignored Christmas 2012 in my blogging life (at least in *this* blogging life) but intend to be back in business in 2013. So this is for you:


By all intents and purposes Craft-Werk seemed to have gone into hibernation. And yes, for the last while I haven't done much but get my equilibrium back after the disconcerting end of my student life. Then I got very busy with my professional life - both old (in journalism) and new (in photography) and that sucked all my creative energy. (Yes, I know you have heard that before *sighs*). But then January comes along and somehow in deepest darkest winter there is always this creative volcano that keeps prodding from beneath the surface. With college out of the way for good, there is no reason not to let it erupt.

So I got crafty after New Year's. What really brings it out is my Protestant frugality. But of course I will only admit to contemporary goody-two-shoes mentality aka environmentally mindedness *coughs*. Because the New Year's display above came from this:

A heap of waste paper from the Christmas crackers at my lovely sister-in-law's Chrimbo dinner. They were just too nice to throw away, I loved its sparkly design and I knew I could do something with it.

And so I got the old trusty scissors out, printed myself some nice alphabet templates and cut away...

The whole arrangement now sits in the drawing room, where before the Christmas tree took up space and then left a rather big gap. (For a previous Christmas cracker project, check out my "Birds of Bling" post from last January) It's all a bit bling, silver glitter on twigs and all, but at least the geometrical vase keeps it all a bit grounded - an Ikea bargain, btw, at € 2, bought in the January sales.

So there we are. Back in business with crafting. I have a few ideas up my sleeves, involving...

  • MDF
  • loooooads of tennis balls
  • and some white tulle
Not in the same project, though... But watch this space.

Happy new year, crafty friends!