FYI


Tuesday, September 18, 2012

Last Attempt at Flowers

Right, the summer is nearly over. As usual I find it hard to accept that. I am fighting it tooth and nail. And just to spite the outdoors which is now beginning to deprive me of fresh flowers, I am bringing the flowers inside.


It all started here. One of those flower garlands. One of my nieces had played a little bit to roughly with it and the string broke. So I decided to take the whole thing apart and use it differently. After all, poor Claus (the rocking horse) was beginning to feel a bit confused, sporting a pink flower garland, anyway...


Essentially I picked the whole thing apart. You are left then with pieces of flimsy fabric, cut into a vague flower shape. I simply just stuck these shapes onto the branches in my vase. The hole in the middle where the string had run through, was handy for pushing the flowers onto the branches. And now the branches have miraculously flowered in mid-September, much to the surprise of my niece.


Yes, it is Tack City. But I like a bit of colour every once in a while. And for a free and easy bit of decoration this was actually fun...


There are a few bits of fabric flowers left over on the string. I already have a cunning idea up my sleeve how that could be used up. Stay tuned...


Best,


Monday, September 17, 2012

The Season of Fruitful Mellowness

It is upon us, that season of fruitful mellowness. In more than one sense. I am free. I have finished my college degree (admittedly already several months ago - but as is usual, I stepped right from the high of finishing three years of college into a depression over the purpose-less future of my now degree-decorated life). So my life is now mellow again and I can return to my second favourite past-time: crafting.

And with the season that is in it, my first project revolved around the fruitfulness of autumn. Yes, it is foraging time again. And after shamefully missing blackberry season last year and having to resort to shop-bought berries for my raspberry jelly 2011, I was adamant I was going to pick some blackberries this year and make that jelly truly my own.

And so I did - I went blackberrying yesterday, up the back of Bray Head on a narrow country lane. The blackberries were not all ripe yet, and you had to look hard to find them. Some even grew in the grass at the bottom of the hedgerow. And the bushes certainly resisted me - in concert with the nettles they seem to team up with. My poor hand bears the reminders of nettlesting and bramblescratch. In the end we came away with what turned into nearly two and a half litres of blackberry juice. 

(If you want instructions on how to make jelly, check this post from last year.)
Much to my delight, the jelly set beautifully. I came away with six and a half jars of what I call "really fruity" blackberry jelly. This is jelly that is made with jam sugar that uses twice as much juice for the amount of sugar that is usually recommended. The result is a slightly less overly sweet, but much more intensely fruity jelly. (Unfortunately I yet have to find a jam sugar brand that produces this kind of sugar in Ireland. I actually imported the jam sugar from Germany this summer. Over there it goes by the name of "2:1".) A second batch of jelly had to be made with the remainder of normal jam sugar - i.e. you use as much sugar (in weight) as fruit juice to make it. This is my so-called "really sweet" jelly, a stash of only three jars.

But as usual I cannot get the ultimate satisfaction for a job well done unless even the details are right. In this case the jars needed labels - because they had to be distinguishable for the two types I made. And I couldn't rest until I had designed my own little label to my own specifications. Such fun to play around...


Now, with the labels stuck on, I am really happy with my jelly. Can't wait to taste it. (Feel free to copy the image and edit it for your own use. Just by cutting out my name and the month you could re-use it for your own purpose.)


Best,


Tuesday, March 20, 2012

Wake up to Yellow

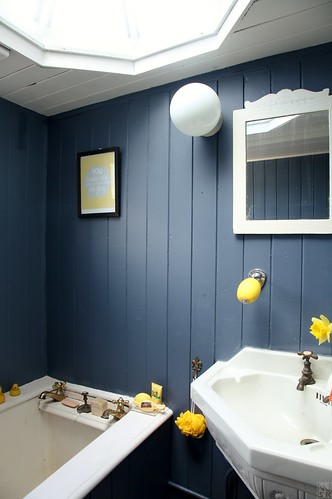
You haven't asked for it, but you are gonna get this anyway - an insight into my bathroom. Incidentally it is trend city: dark gray and bright yellow accents seem to be en vogue. (Just put "gray and yellow" into Google and see what comes up.) Alright, I admit - gray was actually my better half's idea. I was not so enamoured with the colour of rainclouds. But true to form and nickname, I came up with the bursts of yellow and together the combination really rocks. So follow me on a quick tour of my bathroom.


Now, just to give you a bit of context: The house I live in is over 200 years old. Hence it would not have had a bathroom/toilet originally. The bathroom was tacked onto the house about 110 years ago, I reckon. It sits on top of a three-storey extension at the back of our house. The sanitaryware is original!

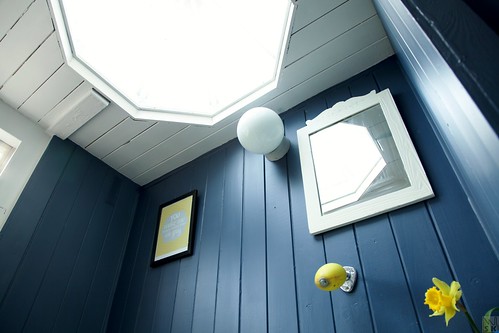
And it has a funny little dome that illuminates it from above (just about visible in the image above).

This is what it looks like when you look up - the dome is a octagon shape.

(I need to do something about that awful light fitting. I know *sighs*) Above the sink you can see my lovely soap holder. I can tell you, I had *some* fun with that implement when I tried to get it onto a plane in my handluggage...

 The security guys had never seen a thing like that before and were very suspicious. Apparently it is a 1950s design from France, available at manufactum. The walls of the bathroom are wood panelled and painted in this luscious (!) dark gray that makes the yellow stand out even more. Here we have a detail of the sink with my toiletries in the background (actually: some lemon soap bought in Sweny's Chemist on Bloomsday!!! Once a James Joyce-fan, always a James Joyce-fan...)

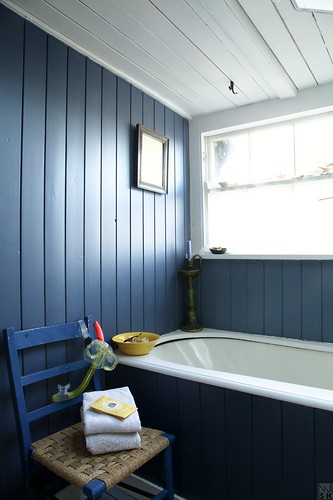
Let's slowly turn to the left from the sink to the bathtub. It's an old tub - but unfortunately not remotely ornate, therefore encased in panels, too. It had to be re-enameled a few years ago as the water seeping from the original taps leaves brown stains on the enamel. As you can see I placed one of my new yellow prints by dimple prints which I found through one of my regular blog reads, Tatertots and Jello, above the tub.

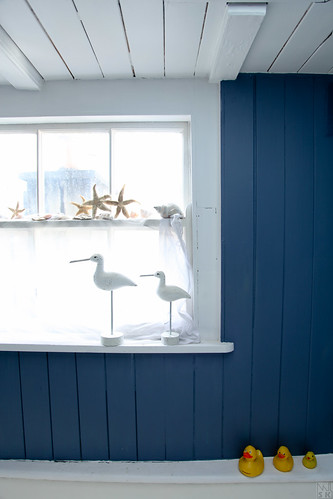
On the windowsill I have a little nod to the sea - a collection of shells, starfish and those simple birds. Love them.


Oh, and the ducks. They are an ongoing collection. The biggest of them came courtesy of my previous employer, the other two were found in the sea!!!

Turn a bit more and you see the other end of the bath. I put the other print there - it's my favourite one "you are my sunshine" and I placed it there so that you can see it as soon as you enter the bathroom (the door is to the right of the sink). With the light streaming in, it reflects in the glass of the frame, so you can't see it properly. (Check yesterday's post for a couple of close-ups!)

I wish I had a before-photo of the bathroom, but unfortunately it was never up to much, hence I never documented it on film or digitally...

Last little turn now, and we will arrive in the final corner of the bathroom...
Here I have quite sneakily left out the towel warmer in the corner beside the cupboard. The brown cupboard is actually a bedside table which stores towels. Beside it is the towel warmer - a nasty 1980s design that is a disgusting beige colour. Spray job? Maybe! The in-built cupboard is courtesy of the better half and houses swimming togs, soaps and assorted bits and bobs. On the shelves are our toothbrushes and some of the most-frequently used creams. Oh, and a picture that used to hang on the bathroom wall - it's an old soap advert from an antique magazine from roughly 1913. "Erasmic Soap" - first time I saw the ad, I misread the ...-asmic bit *oooops*...

Anyway, that's the downstairs bathroom. It mainly gets used by guests these days because our bedrooms are a floor and a half up from this bathroom and therefore we eventually built a new showerroom upstairs. I have to say that the fresh colour scheme of the downstairs bathroom almost entices me to walk those two flights of stairs and come down there to use it... Nah, just kidding.


So, there we are. Hope you liked the little tour of the little bathroom.


Best,


Monday, March 19, 2012

Good Morning, Sunshine!

The other day I saw this really cute print on etsy. It really spoke to me - not just because it was yellow, but because it said "Good morning, sunshine" - and sunshine used to be my nickname, years ago... It would be the perfect picture to wake up to or to be greeted with in the bathroom when I get up to do my early morning shift. And it got me going...


Sorry, boys, I have to release you and wipe you down!
There is actually a yellow zone in my house. It's the downstairs bathroom. It has a few splashes of yellow here and there but it needed some more. And when I came across some free printable yellows courtesy of dimple prints via Tatertots and Jello, I got the kick up my backside to finally do something about my yellow love.  I scoured our "frame cabinet" - a cupboard in our sitting room which is full of old frames with some unnamed ancestors in it. And I found two nice frames. But *eeeeek*, look at the state of them:

That's already better, isn't it? No idea who the ancient tottie is - the family had four daughters, so he's not one of "ours"... I had to dismantle the frames to wipe them down - and of course I cut myself in the process. That's one thing I hate about the old stuff in the house: I am always slightly suspicious of the dust of the centuries that covers everything in here. If I vanish from the blog, you'll know that my right middle finger has turned gangrenous *ggg*

It also turned out that the frame on the right was actually not grey but green. Oooops, doesn't quite go with my colour scheme, but well...

Anyhow, I stuck the sunny prints into the frames and *boom* instant lift!


Curious what the rest of the room looks like??? I'll give you a look tomorrow!


Best,


Saturday, March 17, 2012

Happy St. Patrick's Day

Everything's going to be green today! And since I have taken leave of absence from Facebook, I am communicating to all my friends all over the world via the blog - have a great day, Irish or not.

Smile if you like the Irish!


The leprechauns were pretty active around here. When we sat down to breakfast, they had turned our milk green.

And guess what, that made our customary bowl of Weetabix green, too. (Hm, not sure if I really like the look of this...)

Sure, even the little buns came out green from the oven...

The plan today is to go down to Dame St and watch the parade. I have to admit that I am not a huge fan of this - mainly because the streets will be so crowded that with my height of a mere 1,68 m I will really only be watching the backs of other people's heads. I usually bring a stepladder along - but my kids will be sharing that with their friends while good old Mama has to stay at ground level. *boohoo* I suspect I'd have a better view of the parade on TV...

Happy Paddy's Day!


Best,

Friday, March 16, 2012

Felt Flower

The momentum was kept up today with not one but three crafty things I did. It's already late now and tomorrow is Paddy's Day, so I won't have time to write up all three, but I'll show you todays favourite piece of creativity - a felt flower.


The inspiration for this easy flower pin came from pinterest - or actually a craft blog called Homemaker in Heels. I saw the flower there and decided on a whim that I should try it out. And I did and was lucky at first go. Goes to show how easy this project really is!!!

Here's what you need: A strip of felt, scissors, a glue gun and a brooch pin.


Cut off a piece of felt, about 12" long and 4" wide. Never mind whether it is ironed or not - it won't make any difference to the outcome of the project.


Fold the strip in half.


Sew down the length of the strip and then cut the felt almost down to the seam.


Roll up the length of felt. Secure the last bit with a drop of hot glue.


Now fix the flower by putting hot glue all into the rolled up middle of the flower. Before the glue has hardened, bunch a bit of felt into the middle there to fill it in a little.


Cut a bit of felt and cover the bunched up back of the flower with it. Hot glue a brooch needle onto the back and tidy up all the glue strings.


Presto!


Look how extraordinarily pleased I am with my flower pin. I am grinning like a gingerbread horse (sorry, direct translation from German - but you get the picture... I am happy as Larry, pleased as Peter and delighted as Delilah...) You can almost hear me say tadahhhhhhhhh...


 Anyhow - if you are looking for a simple flower brooch to update an outfit, to prettify a hat or to bump up a bag, this is the project to do as you will more than likely have all ingredients at home. I think I will make many more of these - as pressies for friends, mums and goodie bag contents for the next girly birthday party. It even looks good in my tin of shamrock, planted just in time for Paddy's Day.


Best,


Linking this to:

Tickled Pink @ 504 Main
Frugalicious Friday @ Finding Fabulous

Thursday, March 15, 2012

Easter Nest

The zesty lemon has obviously revived me. My creative juices are literally boiling, it seems. Mind you, I am only doing little projects here, preferably something that is done in ten minutes. Anything else and I have a major guilty conscience because I *really* should be doing my college homework and not some nimsywhimsy crafting... But look what I made:


Easter doesn't get any easier than this! Took me five minutes do make this little nest. It had been on my to-do-list for at least two years. Chances are that you have everything you need for these little beauties at home, anyway: some beads and silver wire.

For my first little nest I didn't take any pictures, but I have created another one just to show you in a tut how these are made. Start by threading your beads onto the wire. I think that three work best, but you can use any number.

Now start winding the wire around the three  beads. Just keep going and going. Occasionally, change direction or move the wire right underneath your developing nest, just so the wire rounds become a little more irregular.

Continue until the nest looks big enough. You can fix a pin to the back of it by simply threading the wire through the holes in it. Unfortunately my nest is not really big enough to disguise the pin - I was just too impatient to finish it.


Anyhow, these are really cute. They are about the size of a thumbnail and might be suitable as pendants or earrings. I am also thinking that they could look sweet as decorations on the Easter table.


Happy Easter decorating...


Best,


Wednesday, March 14, 2012

Ch-ch-ch-changes

Hello hello - yes, I have woken up from hibernation in Hibernia. It is quite evident - not only in the fact that I have already posted a crafty project this week, but that I could not rest until I had spring-cleaned my blog.

Well, it's a bit more than a spring clean, I guess. It's a complete make-over. I just couldn't bear the bright read any longer. Inexplicably I have recently developed a "thing" for bright yellow. I have no idea why. I never particularly liked yellow - too garish, too cold, too sour. But at the moment I simply cannot get enough of yellow. I have been posting quite a bit of that on my Pinterest boards. Maybe I am craving the colour of the sun after months of winter? In any case - since I cannot really re-decorate my house in bright yellow (it would just look out of place, I think), I am revamping craft-werk instead.


Grey is pretty much on trend, too, and doesn't it look great with yellow? I couldn't resist and drag the spring-theme even to the header and reappropriate one of my earlier projects, the bird magnets, for the header illustration. Read about them here.

Oh, and one thing hasn't changed: I am still a geek. And therefore I had to change my favicon from the white scissors on red background to a sleek little factory. (If you want to know how to make your own custom favicon, here's my post.)

That, actually, is my general logo for my RLW (real life work) as a journalist and photographer. Incidentally, if you wanna have a look, check my new photography website which I am currently revamping, too (so not entirely glitch-less yet). It's called imagewerk - of course...

Anyhow, hope you like the new look. While I was at it, I had to change my blog signature, too. After all, it all has to fit together, somehow - the organic look, so to speak. So I made myself a new signature on mylivesignature.com It's dead easy - so had over there and get yourself a personal touch, too ;-)


Best,