Photos play a big part in craft blogs on the net. We all want to display our beautiful creations or show how we made them. Illustrations also work like eyecatchers – posting one at the start of your blog post can attract your readers attention. Chances are that the split-second decision whether the visitors to your blog will read your post or not, is made based on the impression the first photo creates. Photo quality is crucial for that. And having looked at thousands of photos since I first entered Craft-Blogland, I have noticed a number of problems that come up again and again. As you all may have noticed, I am big into photography. Actually I am studying for a degree in photography in college at the moment. And I thought that I might share some of my tips and ideas so you can improve your photography. I’ll illustrate my post with good and bad examples, so you can see my tips in action. So here’s for another “Babes in Geekland”-post... Sonja’s photography tips for dummies bloggers ;-)
1. Centre-stage your Objects!
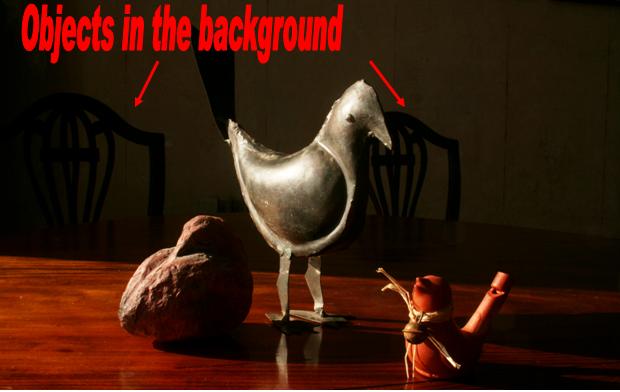
Whether you are taking a picture of your family or of an object – always make sure that nothing distracts from your subjects. So, when photographing something, arrange it nicely and clearly and make sure you have no other objects in the background that might protrude into the scene and distract from the overall image. You get best effects when your background is monochrome – or simply one colour. That way your viewers’ eyes will concentrate on the object in the foreground and their gaze is not distracted by anything else. So set up your object in front of a white wall – or place a piece of board or a sheet behind your object to hide busy and distracting backgrounds.
My example shots are quite subtle, but in picture one you can see some chairs left in the background. Compare with the clean background of shot 2. Which one is more pleasing to the eye when nothing has been changed but the background?
2. Get rid of Shadows!
Try to avoid using flash if you can – either by moving your object near natural light (i.e. window sill) or by scheduling your shoot for daylight hours.
Even daylight will create shadows, but you can even cancel that out by placing a piece of white cardboard or other reflective surface next to your object, but keeping it out of your frame.
Even daylight will create shadows, but you can even cancel that out by placing a piece of white cardboard or other reflective surface next to your object, but keeping it out of your frame.
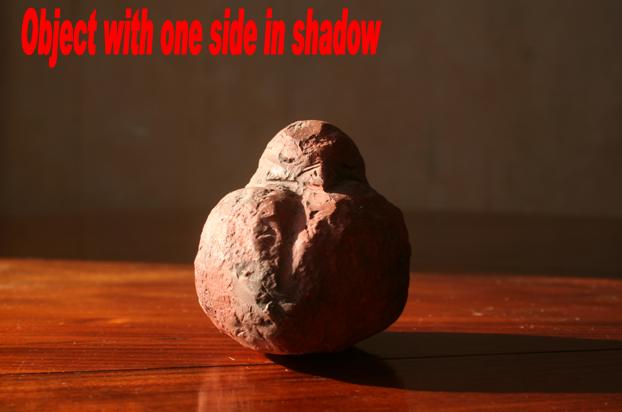
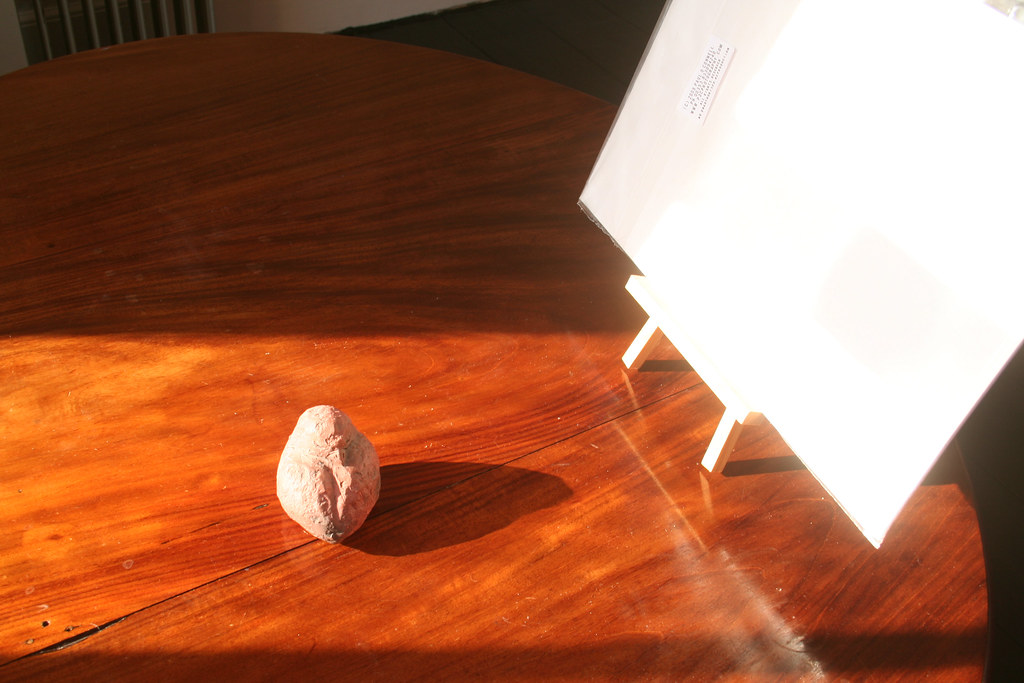
Here is a little birdy which I have shot in the direct sunlight. The effect is actually not that bad, but I have lost some of the bird's detail because the harsh shadow obscures the pretty head. For the second picture I placed white cardboard beside the bird and thus lightened up the shadows.
I have not used any additional lighting, this is the pure sunlight reflected back!!! This is the set-up:
3. Diffuse or Bounce your Flash Light!
As most of our crafty stuff is indoor decorations, we mostly shoot inside. Depending on the amount of light in your room, the camera will automatically fire its flash to illuminate the subject. The result is unsightly hard shadow of the object against the background. Sometimes the shadow obscures other details in the shot, other times it creates reflections and highlights that distract from the overall image. If you must shoot with flash, there are a couple of tricks that the professionals use:
You can make the shadows softer by diffusing the light that fires from your flash. Simply stick a bit of translucent scotch tape over it. It softens the edges of the shadow but will probably still give enough light to illuminate your scene.
You can make the shadows softer by diffusing the light that fires from your flash. Simply stick a bit of translucent scotch tape over it. It softens the edges of the shadow but will probably still give enough light to illuminate your scene.
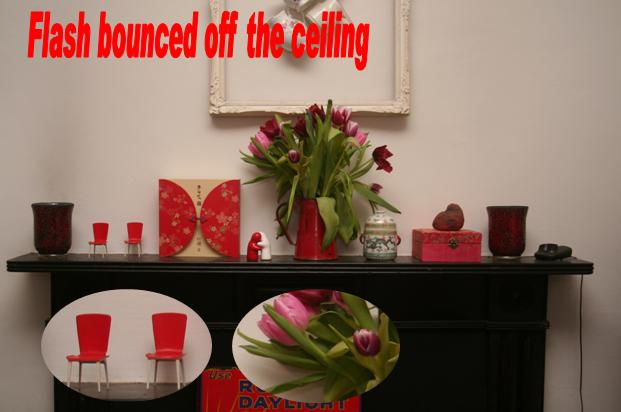
If you are using a separate flash, direct the flash to the ceiling. The theory is thus: Light travels in straight lines. If you point your camera straight onto the object but the flashlight against the ceiling, the light will bounce off the ceiling first, loose some of its brightness and illuminate the scene from above. The shadows will not fall against the background, but more against the surface your object is placed on. Due to the loss in brightness the shadows will also appear softer. As an overall effect the shadows will not be so apparent and will neither distract from nor obscure the object.
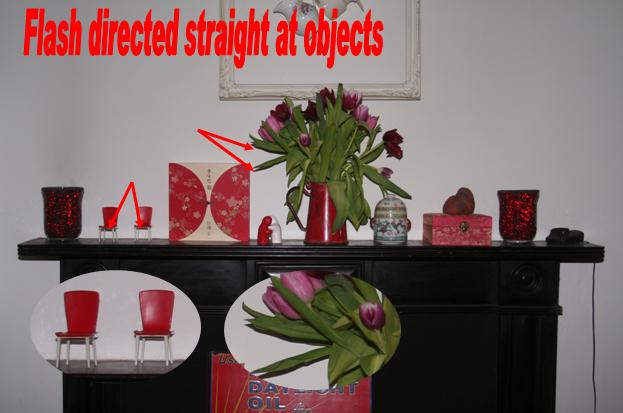
In my example, the flash light creates hard shadow against the wall. The light is rather blueish-cold. Check the insets for the details and compare with the second shot, taken with flashlight bounced off the ceiling.
Can you see how the light appears softer, warmer and the shadows have almost completely gone?
Come back tomorrow for another series of tips on how to improve your photos!



6 comments:
Hey Sonja,
can I book a course with you for my Hasenzahn? I am mean not for crafting but for photography? Really like the post and it is handy to know not only for shoots of crafty stuff!
Keept it rolling :)
hey, those are awesome tips! Thank you so much. I know I need a ton more help in this area, so your ideas are very appreciated. :)
thanks for the tips, I need all the help I can get.
What a terrific post. You are such a great teacher, Sonja. Now to put your tips into action... I shall try!
Love the tips. I especially liked the picture of the white reflective paper on the easel. For some reason, I've never thought to use an easel. I usually try to balance it against something - which never works well. It's a Duh moment for me but I thank you for it!
What a great post! I love how you showed "before and afters" to illustrate what you are talking about. I've read lots of posts with the same information, but hve yet to see on with examples, which really help show a beginner what a difference the little things make! Thanks for taking the time to do it!
Celesa J
lillybunnsboutique.etsy.com
Post a Comment