I want to give back all the help by posting a blog upgrade tutorial myself, because I have just upgraded my blog with something else. It is only teeny-tiny, but I looooove it, nerd that I am.
 Look closely, because that is my new favicon. Don't know what that is? A favicon is that little image that appears beside he URL line in your browser, you know - a mini square logo. Blogger uses the little B in an orange box, Wordpress has the W in a blue circle (that one always reminds me of the Volkswagen logo - well, I am German...). And now Craft-Werk has its signature scissors on the signature bright red! Just look up into your browser line - can you spot it? Hehe, it appears in my browser, and here is the screenshot to prove it:
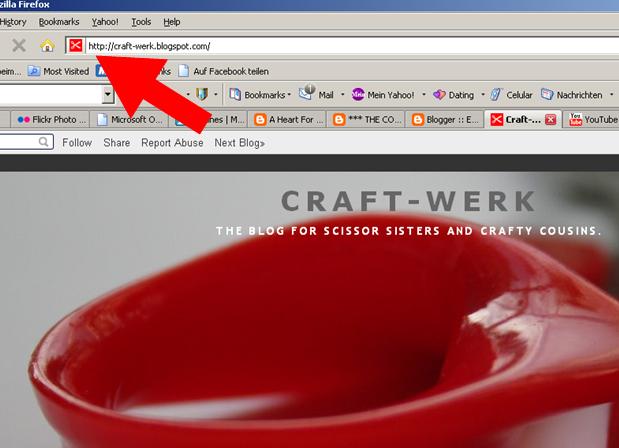
You want it, too? Well, let me explain to you in laywoman's terms how it is done.
First of all you need to design your logo. Remember that a favicon is tiny - 16 by 16 pixels wide - therefore you can't squeeze much into that design. If you have a recognisable acronym for your blog, use that, or use a simple graphic that symbolises your blog's content and theme. Those are all personal choices, that noone can help you with. But I can share how I designed mine. Disclaimer: I am doing this the amateur way - computer and graphic design experts would probably piss their pants die laughing about my simplistic way of doing this. I am vindicated by the fact that it works, though... This is what I did for my blogger blog:
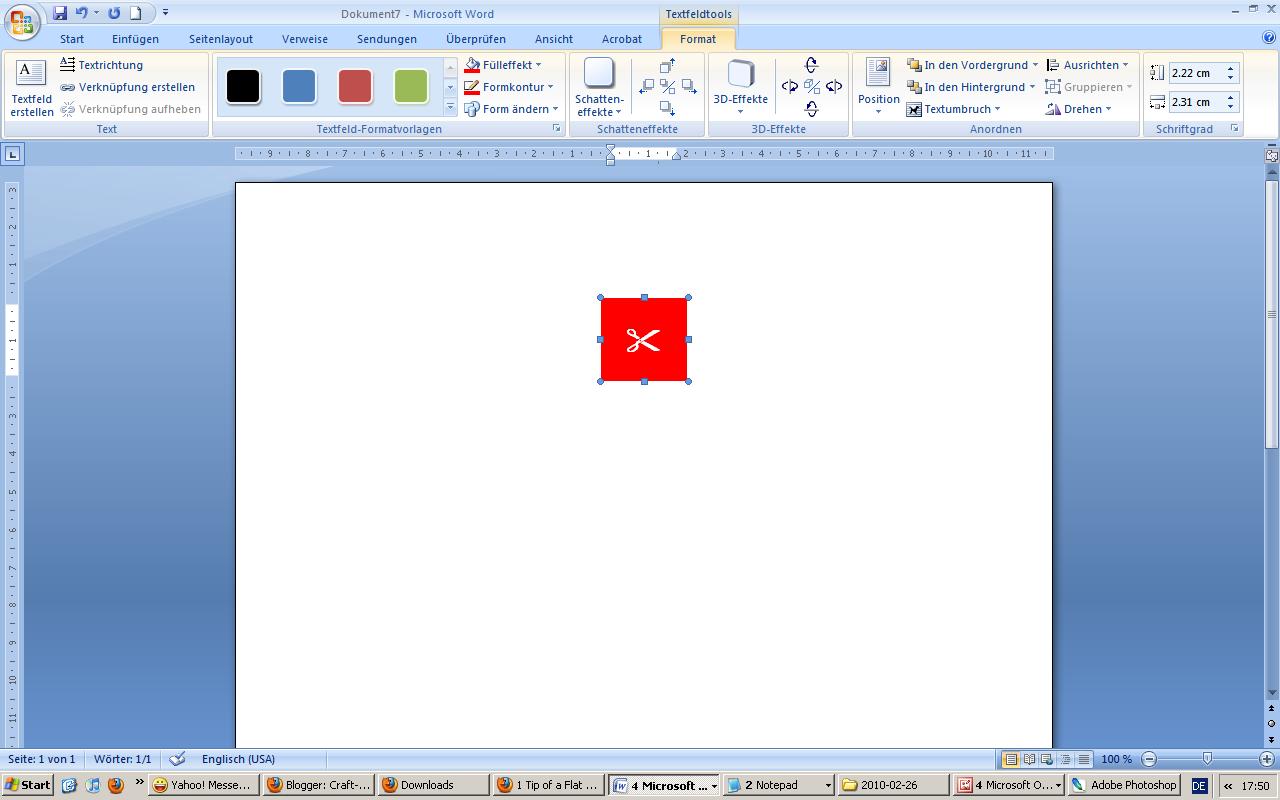
My header features a large photo of red scissors, so I pulled a wingdings scissor symbol into a Word document, created a bright red background and changed the colour of the scissors to white. In order to turn this into an image (as opposed to a text document), I took a screenshot (hit the Prnt Scrn button) and pasted the screenshot into the MS Picture Manager. In Picture Manager I cropped the screenshot down to a square thumbnail of the scissor image. Then I resized it - and this is really important - to 16 by 16 pixels.
The image needs to be a particular format in order to be read and displayed as a favicon. Picture Manager creates Bitmap images - which do not work with this, apparently. I converted it into a GIF image by opening it in Photoshop and re-saving as .gif. Then I uploaded my favicon.gif where I always host my pics - flickr.
 Now we get to the bit with the code. Don't panic, it's not complicated. You need to give your blog template the information that it has to display the favicon with your blog. This information is stored in the Layout section of your blog. Click on the "Edit HML" tab and you will see something like this (right):
The information that you want a favicon to show beside your URL has to be placed at a particular place in the code. That is right in front of this:
</head>. For HTML-idiots like me the easiest way to find it is by simply using your browser search function. Hit ctrl+F and the search box will pop up at the bottom left of you screen, just above the Start button. Copy and paste in there and the browser will mark it green in the code. (You can see it in the code box in the screenshot below.)

The code for displaying a favicon is the following:
<link href="YOUR FAVICON URL" rel="shortcut icon"/>
<link href="YOUR FAVICON URL" rel="icon"/>
Paste the URL where your favicon is hosted into the code that is CAPITALIZED and place it in front of the tag. The screenshot from above already had my favicon info in there.
Check whether it works - simply hit "preview". Then save the template. And done! I think it is really cool! I hope my instructions work for you, too.
Best,

PS: My very own IT manager friend and computer professional Jörg has just sent me a couple of tips and tricks about code. I have updated the above blog post with his helpful hints to make it easier for readers to copy the code and make a favicon themselves. Thanks, Jörg - you are a star!
Linking to:


5 comments:
Oh yes -- I do believe you are a computer geek. That is so cool, Sonja! I'm going to try it. I don't think a bobbypin would be recognizable, but perhaps the two letters BB. It's late now and the brain is fuzzy, but I'm going to bookmark it and DO IT. I LOVE YOURS!!!!! And you are a doll for posting such a sweet comment for my unusual (almost said "failed") ottoman. Do not let that hinder you from the process, however. If you've a fabric piece that you want to change on the cheap, paint it!
Hey Sonja - great idea. Katja said: "Sonja is becoming a geek and has a favicon now. Now I want one myself." ... and she immideately started preparing one herself. She found this website: http://www.favicon.cc - it helps to make icons (.ico) from images and avoids the Word hazzle. You have to find some place to store that .ico on the web, so that you can use that as URL for the Blog. (I could put it onto my college webspace).
And now the real geek ;) If you want to display HTML verbatim, you should put it between <pre> and </pre> tags, and replace all your < characters with < and all your > characters with >, as follows:
<pre>
<link href="your url here" rel="shortcut icon"/>
</pre>
Cool, cool, cool, Jörg - thanks for the advice on displaying the code verbatim on the blog. Ha, I knew there was a way. Otherwise - I hope you have recovered from laughing about my super-amateurish way of getting a favicon up... Off now to check Schnattchen's Blog and see if there is a favicon there.
You are so funny. I have had a favicon on my list of things to do. One of these days I will be all caught up.
Cheri
Thanks Sonia, indeed a computer geek. I’m in website development as well aside from dealing with computer hardware for 12 years now. In fact, I’ve been with my computer longer than my girlfriend. On my own, I was able to learn a lot by merely doing a self study through application with trial and error though it usually takes a lot of time and effort.
Post a Comment