FYI


Showing posts with label silhouette. Show all posts

Saturday, December 31, 2011

A Nice End to an Old Year

Dear readers - I haven't been a good blogger this year. At least not on Craft-Werk. I have been very active in my photoblog 2picsaweek and have also started a German language blog on my life in love-exile. There was little time for crafting in my busy life between college, computer and home.


So a happy new year from moi to you ;-).

The mug you see above was a project I did a while back. You can read about it here. I am selfishly regurgitating it because it has just been featured in Jamie's fabulous blog "Sew Rockin'". Don't be fooled by the name of the blog - there is more going on there than just sewing. Her "Sew Rock Fridays" are a great showcase of projects that other crafters have done, so swing over there and have a peek ;-).

That concludes 2011 - let's see what 2012 brings. Lots of crafty love!


Best,

Thursday, September 16, 2010

Spooky Silhouettes

Mid-September and I see many blogs already busy with Halloween decorating. *umph* not really my type of thing, I have to admit, even though the whole Halloween thing-a-ma-jig originates in my host country, Ireland. But well, my latest project happens to fit the season pretty well...

If you are a regular reader, you know by now that I am quite concerned obsessed with recycling. That is partly due to the fact that I once had a summer job working on a rubbish dump. (Don't ask!) The amount of trash that goes into landfill is just mindblowing! I won't bore you with statistics, but I can see from our household alone that 21st century human beings generate more rubbish than ever. While we recycle as much rubbish as possible, it still bugs me that there is so much plastic material being thrown away. Hence my interest in reusing packaging materials.

With one two-litre-bottle of milk every day, I had built up quite a stash of plastic to work with. I had great plans for a project - which unfortunately didn't turn out the way I wanted it to. I had to find a way of using the cut up pieces of plastic - and this is what I came up with: a 
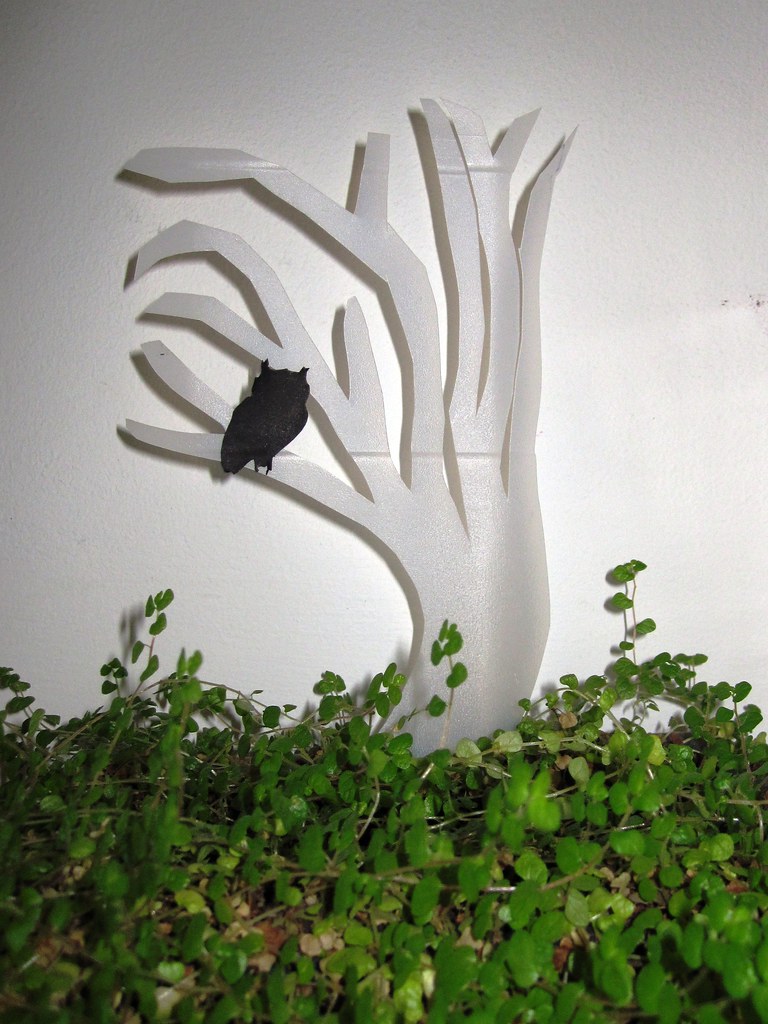
simple spooky silhouette to stick into your flower pots.


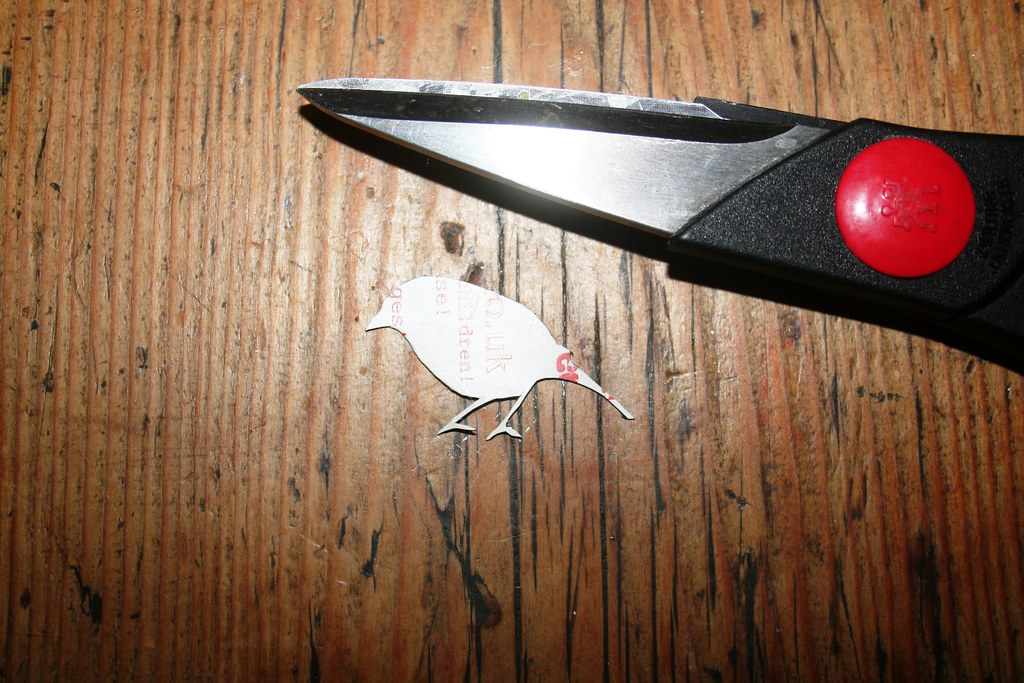
Here's what I did: First of all I cut my milk bottle to get a flat piece of plastic.


Catering for the Halloween theme, I decided on a spooky tree shape. A tree is pretty easy to cut, so I basically free-handed it. But you could always print out a tree shape from cliparts, transfer it to the plastic and then cut it out.

Note that I cut a zigzag at the bottom of the tree - that's for easier sticking the silhouette into the flower pot.


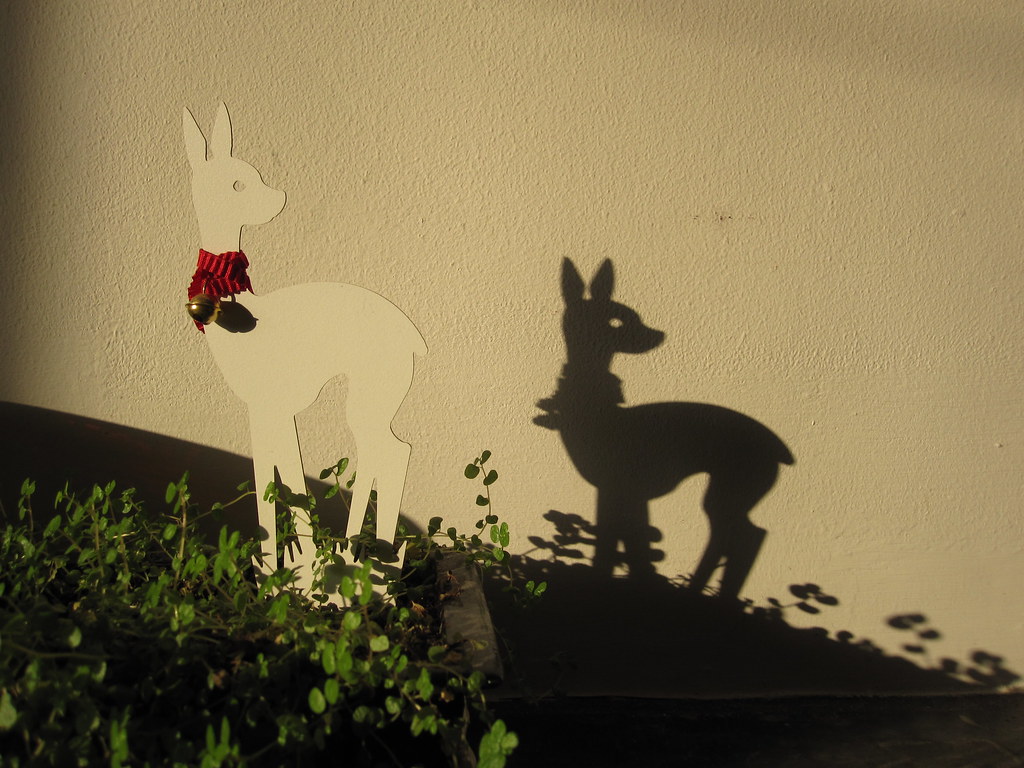
I actually quite like the silhouettes white and without further decoration. I have a beautiful shop-bought one of a little fawn that creates a beautiful shadow on the chimneybreast when the sunlight catches it on my kitchen mantlepiece. The silhouette itself pretty much blends into the white background, but the shadow it creates against the wall is really surprising and lovely.


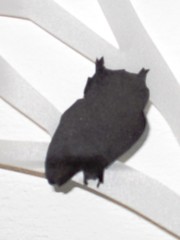
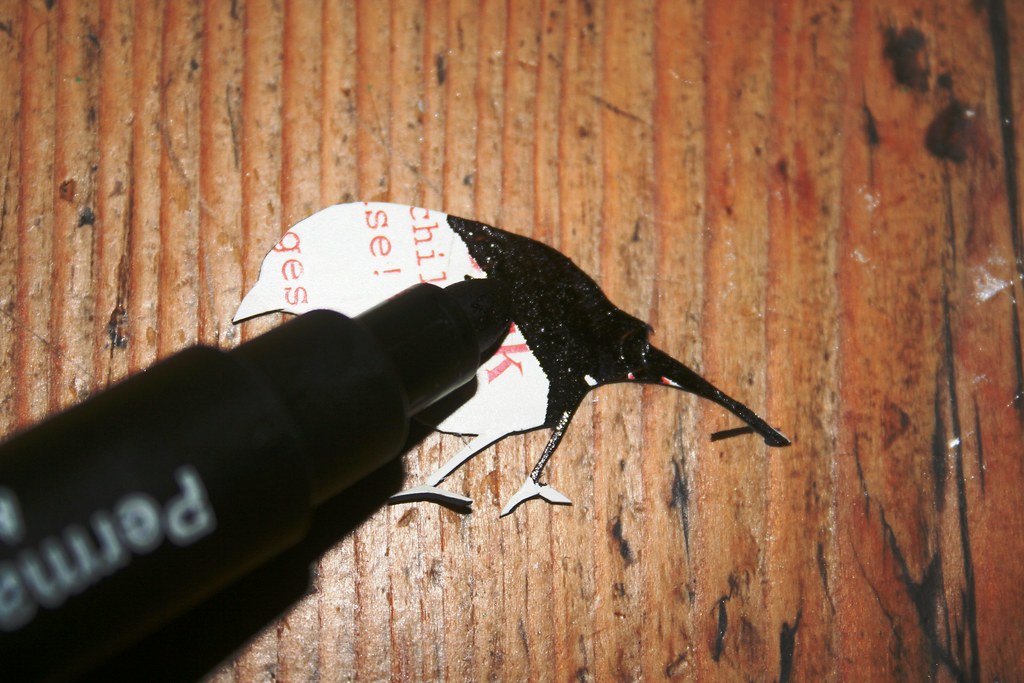
But to make it a bit more fun and stand out a bit more for illustration purposes, I cut out an owl from black paper and stuck him onto the tree.


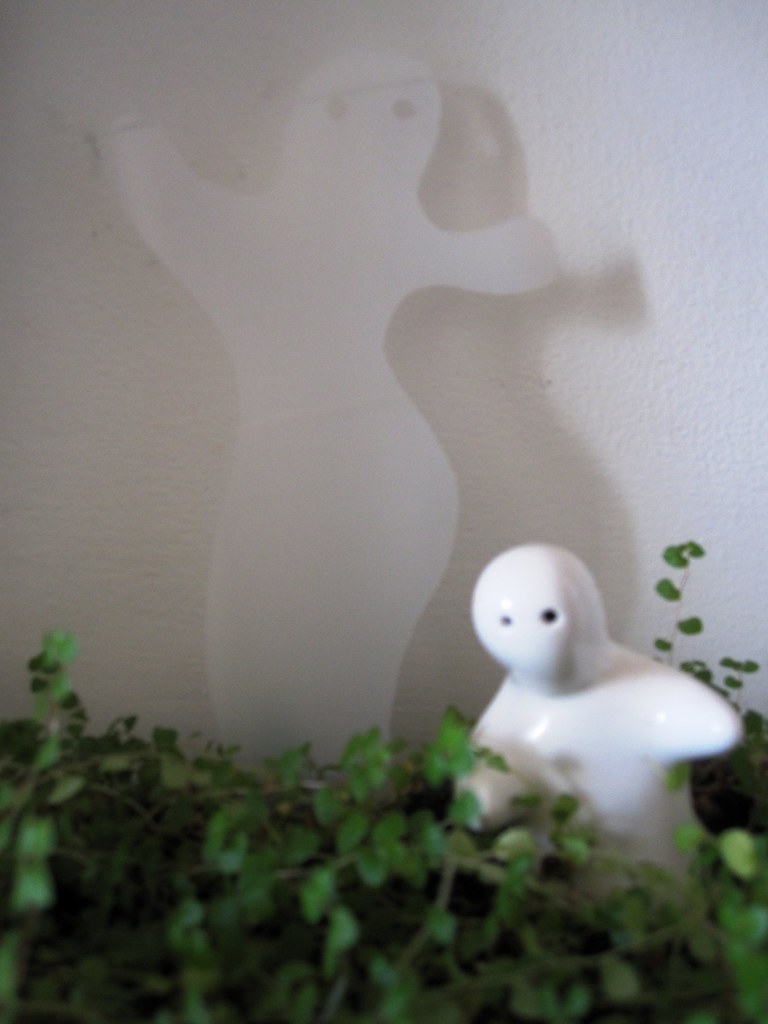
I also tried my hand at a ghost. Whoa, this looks like a curvy bombshell of a she-ghost *lol*. Dancing lambada or something... Ola!!! Again, I cut her free-hand and then used a punch to make her eyes.


Sorry, there was no bright sunlight in my kitchen this afternoon, so the silhouette and shadow do not stand out as much as they should. I guess you could always give the silhouettes a coat of black spray paint to make it fit the dark and spooky Halloween theme. But anyway, there you are - using rubbish to prettify scarify your home.


I am positively fawning over the silhouettes...

Best,


Linking to:

DIY Club
giveaways 


Get your craft on Thurs.

Sunday, February 14, 2010

Classy Silhouettes

Black is such a classy colour. I mostly wear black (apart from my trademark red), but I do not really use it much in my interior dreamings. But I have noticed that an awful lot of re-dos that I see in blogs is done with black paint. Well, here is a little idea that might appeal to all you lovers of the colour black out there. 'Cause today I made a couple of classy silhouettes.


The inspiration for this project came from a whole wall of silhouettes. These are two silhouettes of ancestors. I think they are late 18th and early 19th century respectively. Before the invention of photography in 1836, the cheapest way for the burgeoning bourgeoisie to have a portrait done, was having a silhouette cut. If you look closely at the lady on the left, you will notice the fine detail and care that went into these "likenesses". This silhouette was not cut, though, but painted. The outline of the head was painted black and then the details such as the hair and the ear were added. They even included the eyelashes. Isn't this lady beautiful? (I am thinking Elizabeth Bennett, here...)
Here is another silhouette, which I believe is pre-19th century, just based on her hairstyle. Again, this is a painted silhouette. The fine details of hair and bows would have been impossible to cut. Both miniatures are about 3-4 cm in size (approx. 1 - 1.5 inches). - Isn't it wonderful to think that these likenesses are still around, long after the two ladies are gone? They certainly we held very preciously and are mounted in sweet little wooden frames with gilt edges...
I decided on a slightly more modern version of the silhouette by inverting the colours - light silhouette against a dark background. The paper I chose for the silhouette came from my stash of security envelopes. I haven't been able to stop collecting those ever since my ill-fated "Material of the Week"-adventures last year... (See some other projects with security envelope paper here: paper beads, a little garland, card decorations and mini-envelopes.)

Sorry, no photos of the individual steps, but it is pretty self-explanatory: I printed a photo of my own, regal head in profile onto the back of the security envelope paper. Then I cut it out with small scissors. (Brrrr, hate using flash - leaves very ugly shadows on the pics. Obviously, the frame is perfectly round, not oval...)

The idea for the frames came to me the other day when I was doing the recycling. While taking the lids off all the empty jars that were going into the glass recycling, it occurred to me that they make perfect little frames. So out came the blackboard spray (proper black spray paint would do much better, but I haven't got any), and I gave the two chosen lids a good spray. Make sure you choose lids that are not of the "twist off"-variety. Those have irregular rims and do look too much like lids...

Be patient until your spray paint has dried and then stick your silhouette into the lid. (As usual I was impatient, scratched the not-yet-dried surfaces and had to touch up with a marker *tstststs*.) Since my ribbon collection is newly organised *yoohay*, I quickly found a length of black velvet ribbon onto which I stuck the lids miniatures. It looked a bit too bare like that, so I embellished a bit with bits of pieces in my "miscellaneous" box. To hang the length of ribbon, I made a bow. Cheapskate that I am, I had some little silver beads on thin wire (dismantled from a Christmas cracker... I know, I am a total crackpot, saving fiddly bits like that...). And guess what the silver star/snowflake ornament on the bow is? .... It's the hanger from a Christmas bauble!!! When taking down the Christmas decorations, one bauble smashed and I kept the hanger (yeah, definite crackpot, Sonja!). I simply flattened it. Then I put the wires from the beads through the star and pushed it through the velvet bow and the ribbon. I also attached a small satin ribbon to hang it up

Lastly, I glued the lids onto the ribbon. Continuing with the tradition of keeping the ladies' likenesses, I also made a silhouette of my daughter. And here it is, my silhouette display - preliminarily hung above the shelf beside my desk.

  
So, there is a classy little project for you - that will cost you nothing, but is priceless

Best,


Linking to:


Photobucket


DIY Day @ ASPTL


http://itssoverycheri.com/2010/02/14/its-so-very-creative-party/?


The Girl Creative


Sunday, January 3, 2010

Christmas is Over - Let's Hear Some Birdies for Springtime

Happy new year, everyone! I hope you had a great Christmas and a lovely "slide" into the new year, as we say in German. Any new year's resolutions? Mine are fairly simple:

  1. Spend more time with the children
  2. Smoke less
  3. Update the blog more regularly
  4. Study on time to avoid nightshifts and worries as before deadline in December
  5. Take more photos and experiment more with photography
I am a self-confessed Christmas-lover, but this year I seem to be a bit impatient about getting all the Christmas stuff down again. Traditionally the date for that is the 6th of January. Maybe I can't wait for that because our - beautiful - Christmas tree is half-naked already. No, decorations are still up, but the tree looses needles if you as much as cough beside it!!! The cats have been doing their best, too, to strip the tree of its greenery. Well - nonetheless it was a beautiful tree and the photos I took do not do it any justice:


However, now that we have passed the winter solstice and the days are getting longer again - yoohay - I can't wait to leave Christmas behind me and welcome the spring. My fingers were itching again to do something crafty, so I sat down spontaneously yesterday with a bright idea. Seeing that bird silhouettes are still - just about? - the rage, I made some bird magnets.


You probably have some old, simple fridge magnets stuck on your fridge door. Well, actually you may not - as you all have carefully decorated, tastefully designed kitchens in which mucky old magnets do not feature *ahem*. Well, mine came from the dishwasher door *double ahem* ... box with thrown-out bits and pieces. *remembertoincludenotlyinginlistofresolutions*  Anyway, you often get them as little advertising gifts, thin strips of magnets with a company logo or message printed onto them. 


I doodled a bit and then settled on a bird design which I drew onto the back of the magnet. I used some silver gel marker for that - just because that was easily visible on the black magnet.


Then I cut out the silhouette with my kitchen scissors. This part of the project probably would benefit from some sharp crafting scissors. But with a bit of patience and luck even my klutzy kitchen scissors did the trick and I cut out two different types of silhouettes.


Lastly I simply coloured the front of it in with some black permanent marker. Any colour, I guess, would do. You could tie them in with your colour scheme or use spray paint to get an even finish. 


Here are the birdies - they have taken refuge on my poetree on the dishwasher door. What do you think of them?