 Anyway - it occurred to me that baking is crafts with food. You make something yourself and there is often a lot of thought put into the presentation and/or decoration of the produced dish. And that's why I decided to include a recipe here in Craft-Werk.
As a German living in exile, I really miss hearty bread. The so called "wholemeal" bread here is not an ounce healthier than your average white loaf and soda bread is occasionally nice with a bit of smoked salmon and a slice of lemon, but is usually too crumbly for my taste. A thoughtful friend gave me a bread maker years ago, though, and I haven't looked back since. I bake my family's own bread (only my non-German partner occasionally giving in to the temptation of shop-bought "bread"), with as many seeds and grains in it as I can get away with. Recently I discovered how easy it is to use the machine to produce the dough overnight and then shape and bake bread rolls ("Brötchen") in the morning, ready and warm for breakfast.
So here is my crafts project for today - Flour Power.
 Make a yeast dough - either in a breadmaker or by hand. My recipe for the breadmaker needs 250ml milk, 1 egg, 450g flour, 40g soft butter, 1 tsp salt, 2 tsp sugar, half a sachet of ready-yeast. Follow the instructions of your breadmaker and produce the dough. Or combine all ingredients to a soft, not too sticky dough and let it rise in a warm place for at least an hour and a half.
After rising, knead the dough thoroughly again and work in more flour if it is too sticky. (It is perfect when the dough is soft, yet doesn't stick to your hands.) Now shape the dough into a long sausage, approx. the width of a cucumber. Cut 1.5cm pieces, shape them individually in a ball, then squash them slightly.
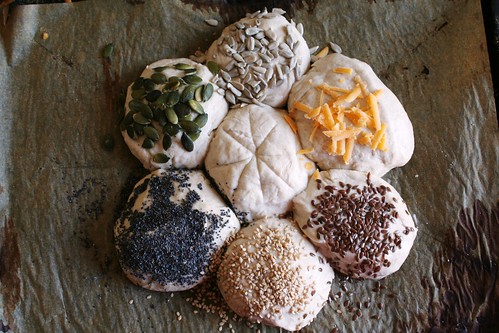
For presentation's sake arrange the individual rolls on a baking tray in a flower shape, starting with the centre one. They don't even have to touch each other - they will rise later and then stick together. Cut across the tops with scissors or a knife.
Now you can decorate them to your own taste with all sorts of seeds and grains. Brush them lightly with milk and then sprinkle the seeds on. I used poppy seeds, sesame, linseeds, pumpkin seed, sunflower seed and grated cheese.
Ideally you should let the rolls rise in the oven for another 15 mins before you finally bake them for approx. 20 mins at 180°C. Yeast pastry is best eaten freshly from the oven, so have a nice breakfast quick!

3 comments:
standing ovations, liebe Sonja!!!
die Photos sind echt gut - das Rezept sowieso :)
x0x0x0
Hey Ariane - danke für den Kommentar. Backen macht Spaß, weil man das Produkt so gut mit anderen teilen kann ;-). Dein Lob für meine Fotos freut mich besonders - meine große Leidenschaft, die Fotografie...
those look phenomenal! We started baking our own bread too last year. The hardest part for us is to find the active yeast at a reasonable price. ugh. :)
Post a Comment